 Christian Melendez
My First Bot with Microsoft Bot Framework in .NET and Xamarin
Tweet Tue 01 August 2017As developers we always try to find the easiest way to solve problems. This time, I'm glad to introduce you an easy way to create your own Bot in just minutes, from your local computer to the cloud. But that's not enough, we will take one step further and connect our Bot with Xamarin, we'll see how easy is to get started.

So, before we start we need to download a few things:
0. Requirements
- Download the template for Visual Studio here. By having this template you'll avoid having to install the Nuget Packages and some initial code.
- To install the template, you need to copy the zip file (do not extract it) to your Visual Studio Templates folder, in my case is:
C:\Users\Christian\Documents\Visual Studio 2017\Templates\ProjectTemplates\Visual C#... Just replace "Christian" with your user. - Download and Install the Bot Framework Emulator here
- Azure account to publish the bot (it could be anywhere, but it's easier here)
1. Create the Bot

Let's create the bot by following this steps:
- Open VS and inside
Visual C#you'll seeBot Applicationproject (if you moved the zip file with VS opened, you need to close and open again), click there and then OK - Create a new folder in the project called
Ordersor choose a different name, it doesn't matter - Inside this new folder, create a new class called
ComputerOrder, this is where we will define the questions of the Bot and the options. In this case we're choosing one easy way to create a guided conversation by using aFormFlowdialog, it is like we were creating a form by using properties in the class, it supports some basic types and in our case today we'll use only theEnumerationtype, you can find more information in the docs here. - Add the
[Serializable]attribute to the ComputerOrder class (if not the message won't be serialized when sending it to the API)
[Serializable]
public class ComputerOrder
{

}
- Let's create our first question by creating an enum like this (create it in the same namespace or in a separate file, just make sure you reference it):
public enum Memory
{
    _4GB,
    _8GB,
    _16GB
}
- In the ComputerOrder class add a new property called
MemoryOptionof the typeMemory(the enum you just created). The name of the class should be in CamelCase in order to have a more readable question, in this case the question will bePlease choose a Memory Option.
public Memory? MemoryOption { get; set; }
- Now, one important aspect of a bot is that it needs to be presented with a message, to do this add it inside the BuildForm method of the ComputerOrder class. It should look like this now:
[Serializable]
public class ComputerOrder
{
    public Memory? MemoryOption { get; set; }

    public static IForm<ComputerOrder> BuildForm()
    {
        return new FormBuilder<ComputerOrder>()
            .Message("Welcome to the Computer Sale Bot!")
            .Message("With my help you can build your custom computer, just choose an option or type the number that you wish.")
            .Build();
    }
}
- Go back to the controllers in the project and in the MessagesController you need to add the references for the FormFlow dialog, Bot Connector and the class that includes all questions:
using Microsoft.Bot.Builder.FormFlow;
using Microsoft.Bot.Connector;
using ComputerSaleBot.Orders;
- Inside of the controller, create the method that will generate the dialogs for the bot:
internal static IDialog<ComputerOrder> MakeRootDialog()
{
    return Chain.From(() => FormDialog.FromForm(ComputerOrder.BuildForm));
}
- Inside the Post action of the controller, you'll find something like this:
await Conversation.SendAsync(activity, () => new Dialogs.RootDialog());
- You need to replace it with the following:
await Conversation.SendAsync(activity, MakeRootDialog);
- Test your bot by launching the website locally (as you usually launch local website apps)
- Open the Bot Framework Emulator and paste the URL that VS just launched and add the controller route
/api/messages, something likehttp://localhost:3979/api/messages

- In a real world, just one question is not enough, so you can keep adding more enums and properties to the class and the Bot will have more questions to ask to the user.
2. Publish the Bot
It doesn't matter if you didn't add more "questions", you're ready to publish the bot now. I'm going to use Azure to ease this task and this time I'll publish directly from Visual Studio but this is just to get started quickly, I don't recommend keeping it this way, instead we should configure an automated pipeline using tools like Jenkins or Team Services. So, for now you can follow these steps:
- Right click in the Web project and click "Publish"
- Choose "Microsoft Azure App Service" and "Create New"
- Fill in the blanks (API App Name, Subscription, Resource Group and App Service Plan)
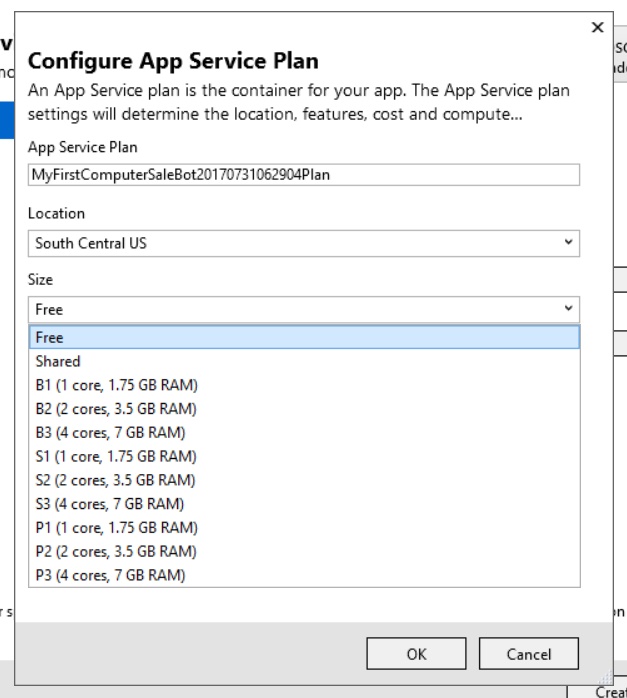
- When choosing an
App Service Planyou can create a new one and choose the Free option (I did it) - Click
Createand wait some time, when finished VS will launch the API in the browser

3. Register the Bot
You need to register your Bot so you can easily add more integrations and focus the Bot only. So for this you just need to go to: https://bots.botframework.com, sign in with your account and then:
- Click the "Create a bot" button
- It will launch a new page, click the "Register" button
- Fill in the blanks all the details of your Bot profile
- In the configuration section, you need to put the URL of the bot endpoint (the one we published in Azure) using HTTPS, for example:
https://computersalebot20170731064536.azurewebsites.net/api/messages - Click in the "Create Microsoft App ID and password" button to generate the keys, copy this generated values temporary because we'll use them to connect our Xamarin app with the Bot.
- Agree to the terms of use (obviously)
- Click "Register"
- Now, this is very important, in order for this to work you need to deploy the Webapi again but with the generated keys you just copied when registering the Bot. To do this go to the Web.config file in the project and fill all the blanks in the
appSettingssection: BotId, MicrosoftAppId and MicrosoftAppPassword. - Publish again and you're done
- You can go to the page where you registered the bot and test it, it will launch the same simulator you launched locally but in the browser, do this just to make sure the Bot it's well configured
4. Integrate with Xamarin
The way we're going to integrate the Bot with our Xamarin App is by using the Direct Line channel, this is a REST API that uses standard secret/token authentication, if you're interesting in knowing more go the docs here. This time, I'll give you an app where you just need to change the secret/token, you can go deeper by reading the code and extending it (I might write an article later). The idea here is to get your hands dirty as soon as possible and demonstrate how easy is to get started. So, follow these steps:
- Go to your Bot page in https://dev.botframework.com/bots
- Click in the name of the bot you just created
- Under the "Add a channel" section, click in the Direct Line icon
![]()
- Click in the "+ Add new site" button and put a name and click "Done"
- The generated keys are the ones we're going to use to connect the Xamarin app with the Bot
- Click in the "Show" link and copy the value
- Click in the "Done" button at the left-bottom of the page
- It's time to download the sample code, for this go here and clone/download it
- Go to the MainPageViewModel.cs file and where it says "botSecret" (line #88) replace the text "SecretKey" with the one you just copied when creating the Direct Line channel
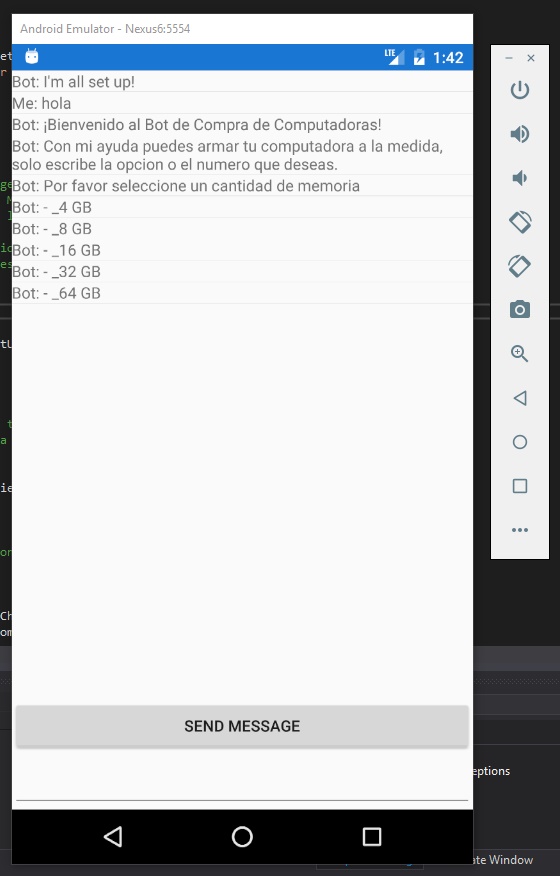
- And that's it, launch the simulator in your computer (or deploy directly to your device) and start talking with your Bot
This is what you should see when the app is running ...
Reference Links
- Bot source code: https://github.com/christianhxc/BotVentaDeComputadoras
- Xamarin app source code: https://github.com/christianhxc/XamarinFormsBot
- Slides (Spanish): https://www.slideshare.net/christianhxc/mi-primer-bot-bot-framework-xamarin
- Samples: https://github.com/Microsoft/BotBuilder-Samples
- Recorded workshop (Spanish): https://www.youtube.com/watch?v=v6fgn8GB5KY
This is my own version, the original content is from: @HJaimesDev and @JorgeCupi
I gave this talk as a workshop for the Xamarin Fest in Guatemala City, you can take a look to another great talk on how to integrate Custom Vision with Xamarin by Guillermo Zepeda @cloudzepeda in this [link]
Summary
I hope you have enjoyed this article and experienced by yourself how easy is to get started with the Bot Framework and not just that, connect it with your Xamarin App. This is just a jumpstart, I didn't do a deep dive on each section because the intention was to get you started fast (yes, I've said that so many times lol). If you'd like to do everything that I did here (with you hopefully) you can follow me in the Youtube video I put in the reference links, that's the video of my talk I mentioned, so even if you don't speak Spanish you can see how all steps connect in case you missed something or I didn't explain myself well enough ;)